
Imagine this: you kick back, grab your favorite gaming keyboard and mouse, and launch the game on your computer—only to find it running a bit differently than on your friend’s rig.
The thing is, the same game on two different PCs of the exact same model and specs can be slower or glitchy on one. You can often fix these problems by tweaking your RAM or SSD BIOS settings or just optimizing your PC BIOS for better performance and gaming.
In this article, we highlight a few things you must know and do if you want a better gaming experience by getting the best out of your Windows BIOS settings.
- 💡 The BIOS lets you tweak CPU, RAM, power, and storage at boot for free performance gains.
- 🗝️ Key tweaks: update firmware; enable XMP/EXPO; overclock CPU or use AI overclocking; turn on Resizable BAR/SAM; set SATA to AHCI; tune fan curves.
- 🧩 Advanced: enable PBO2/Curve Optimizer; adjust memory timings; remove/raise CPU power limits; apply DDR5-specific options; run AI BIOS optimization.
What Is the BIOS?
BIOS is short for Basic Input/Output System. It is the firmware that comes preinstalled on every PC and is the first code to run whenever you boot up your computer. It manages the boot process—performing the Power-On Self-Test (POST) before Windows loads—and locates software and drivers on your PC to ensure your hardware and OS (operating system) work in concert.
But it goes beyond that: with a bit of knowledge and the right approach, you can squeeze out extra performance from your PC without having to swap out your hardware. Once you have a good handle on it, you can control how your PC runs every time you turn it on.
How to Get into the BIOS Settings
You will not find the BIOS settings within the normal Windows-running interface. These settings can only be accessed when your PC is booting up. In other words, that small interval of time between your PC coming on and launching your default drivers and services is when you can intercept it and get into the BIOS settings.
📌 Also interesting: How to Change Boot Order in BIOS in Windows 10/11
Tips for accessing the BIOS settings on Windows computers
To access the BIOS settings on your Windows PC, follow the steps outlined below:
- Restart your computer. This is so you can get the PC into that aforementioned phase between its initial bootup and loading of drivers and services. You can do this by closing every program you have running in the background and then clicking the
Windows key + Dto get to your desktop. Next, useAlt + F4to get the shutdown options, and scroll down until you get to Restart. - After the computer goes off, start clicking the hotkeys. The hotkeys on your keyboard include the
F1toF12keys. Continue to click on theF2key once your PC comes on. Don’t allow it to load up the OS—so if you see your PC showing the Windows logo, you were a second too late. Restart the process.
📌 Also interesting: How to Perform a Clean Boot in Windows 10?
What if you can’t get into the BIOS settings even after clicking on hotkeys during Windows startup?
If you click on F2 multiple times and you still can’t get into the BIOS settings, something might be wrong with your keyboard or Windows startup procedure.
Usually, holding Shift while clicking Restart should work and let you load into the BIOS.
However, if you run an old Windows 10 system, the Fast Startup protocol might be affecting the process, and you might need to disable it before you can use the BIOS settings.
To fix this problem, follow the steps below:
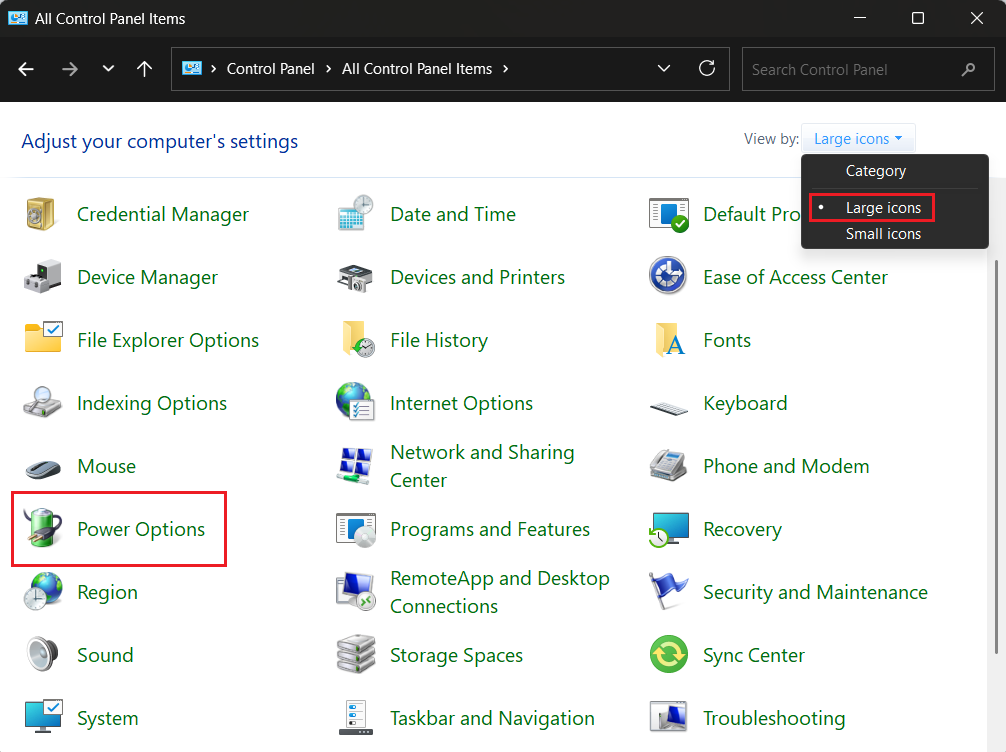
- Press the
Windows key + Sand search for Control Panel. - Switch View by to Large icons and click Power Options.
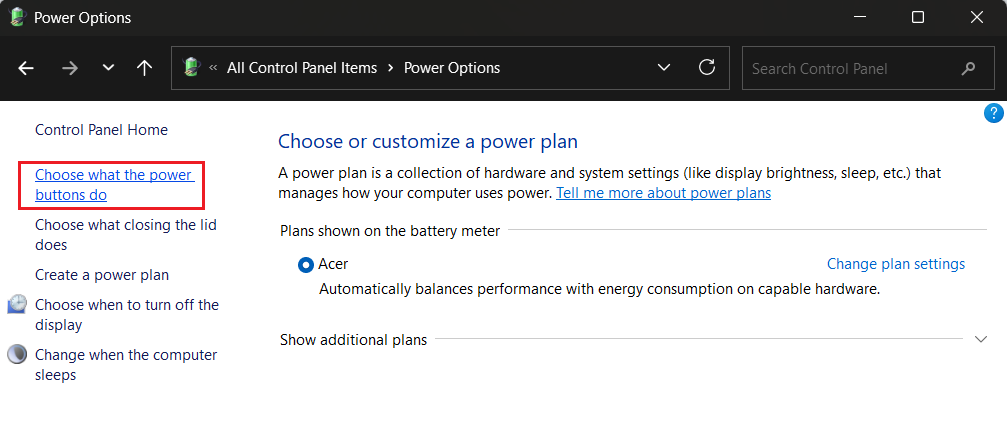
- Select the Change what the power buttons do option.
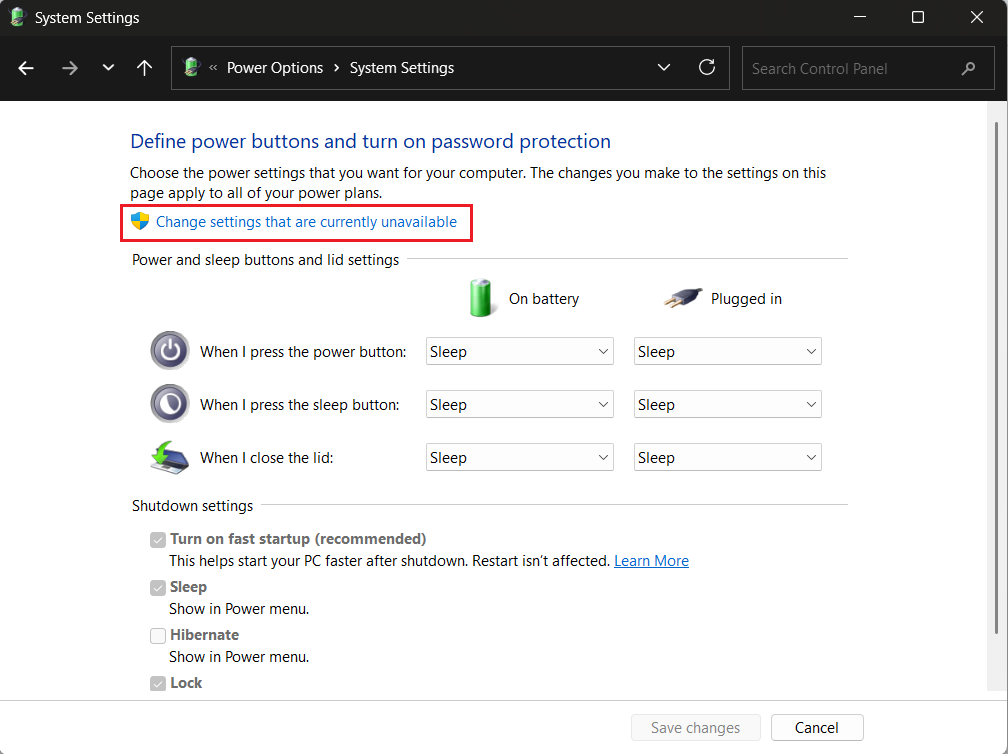
- Click on Change settings that are currently unavailable at the top of your screen.
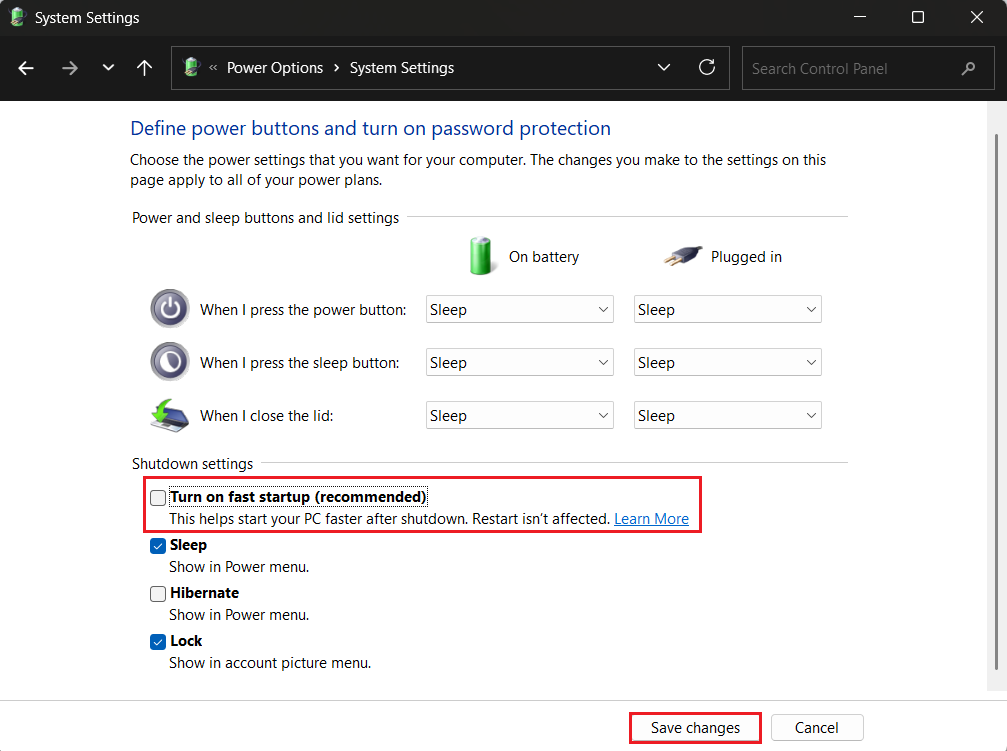
- Uncheck the Turn on fast startup (recommended) option and click Save changes.
- Restart your computer and try to get into the BIOS settings again.
Hotkeys for getting into the BIOS settings on different computer models
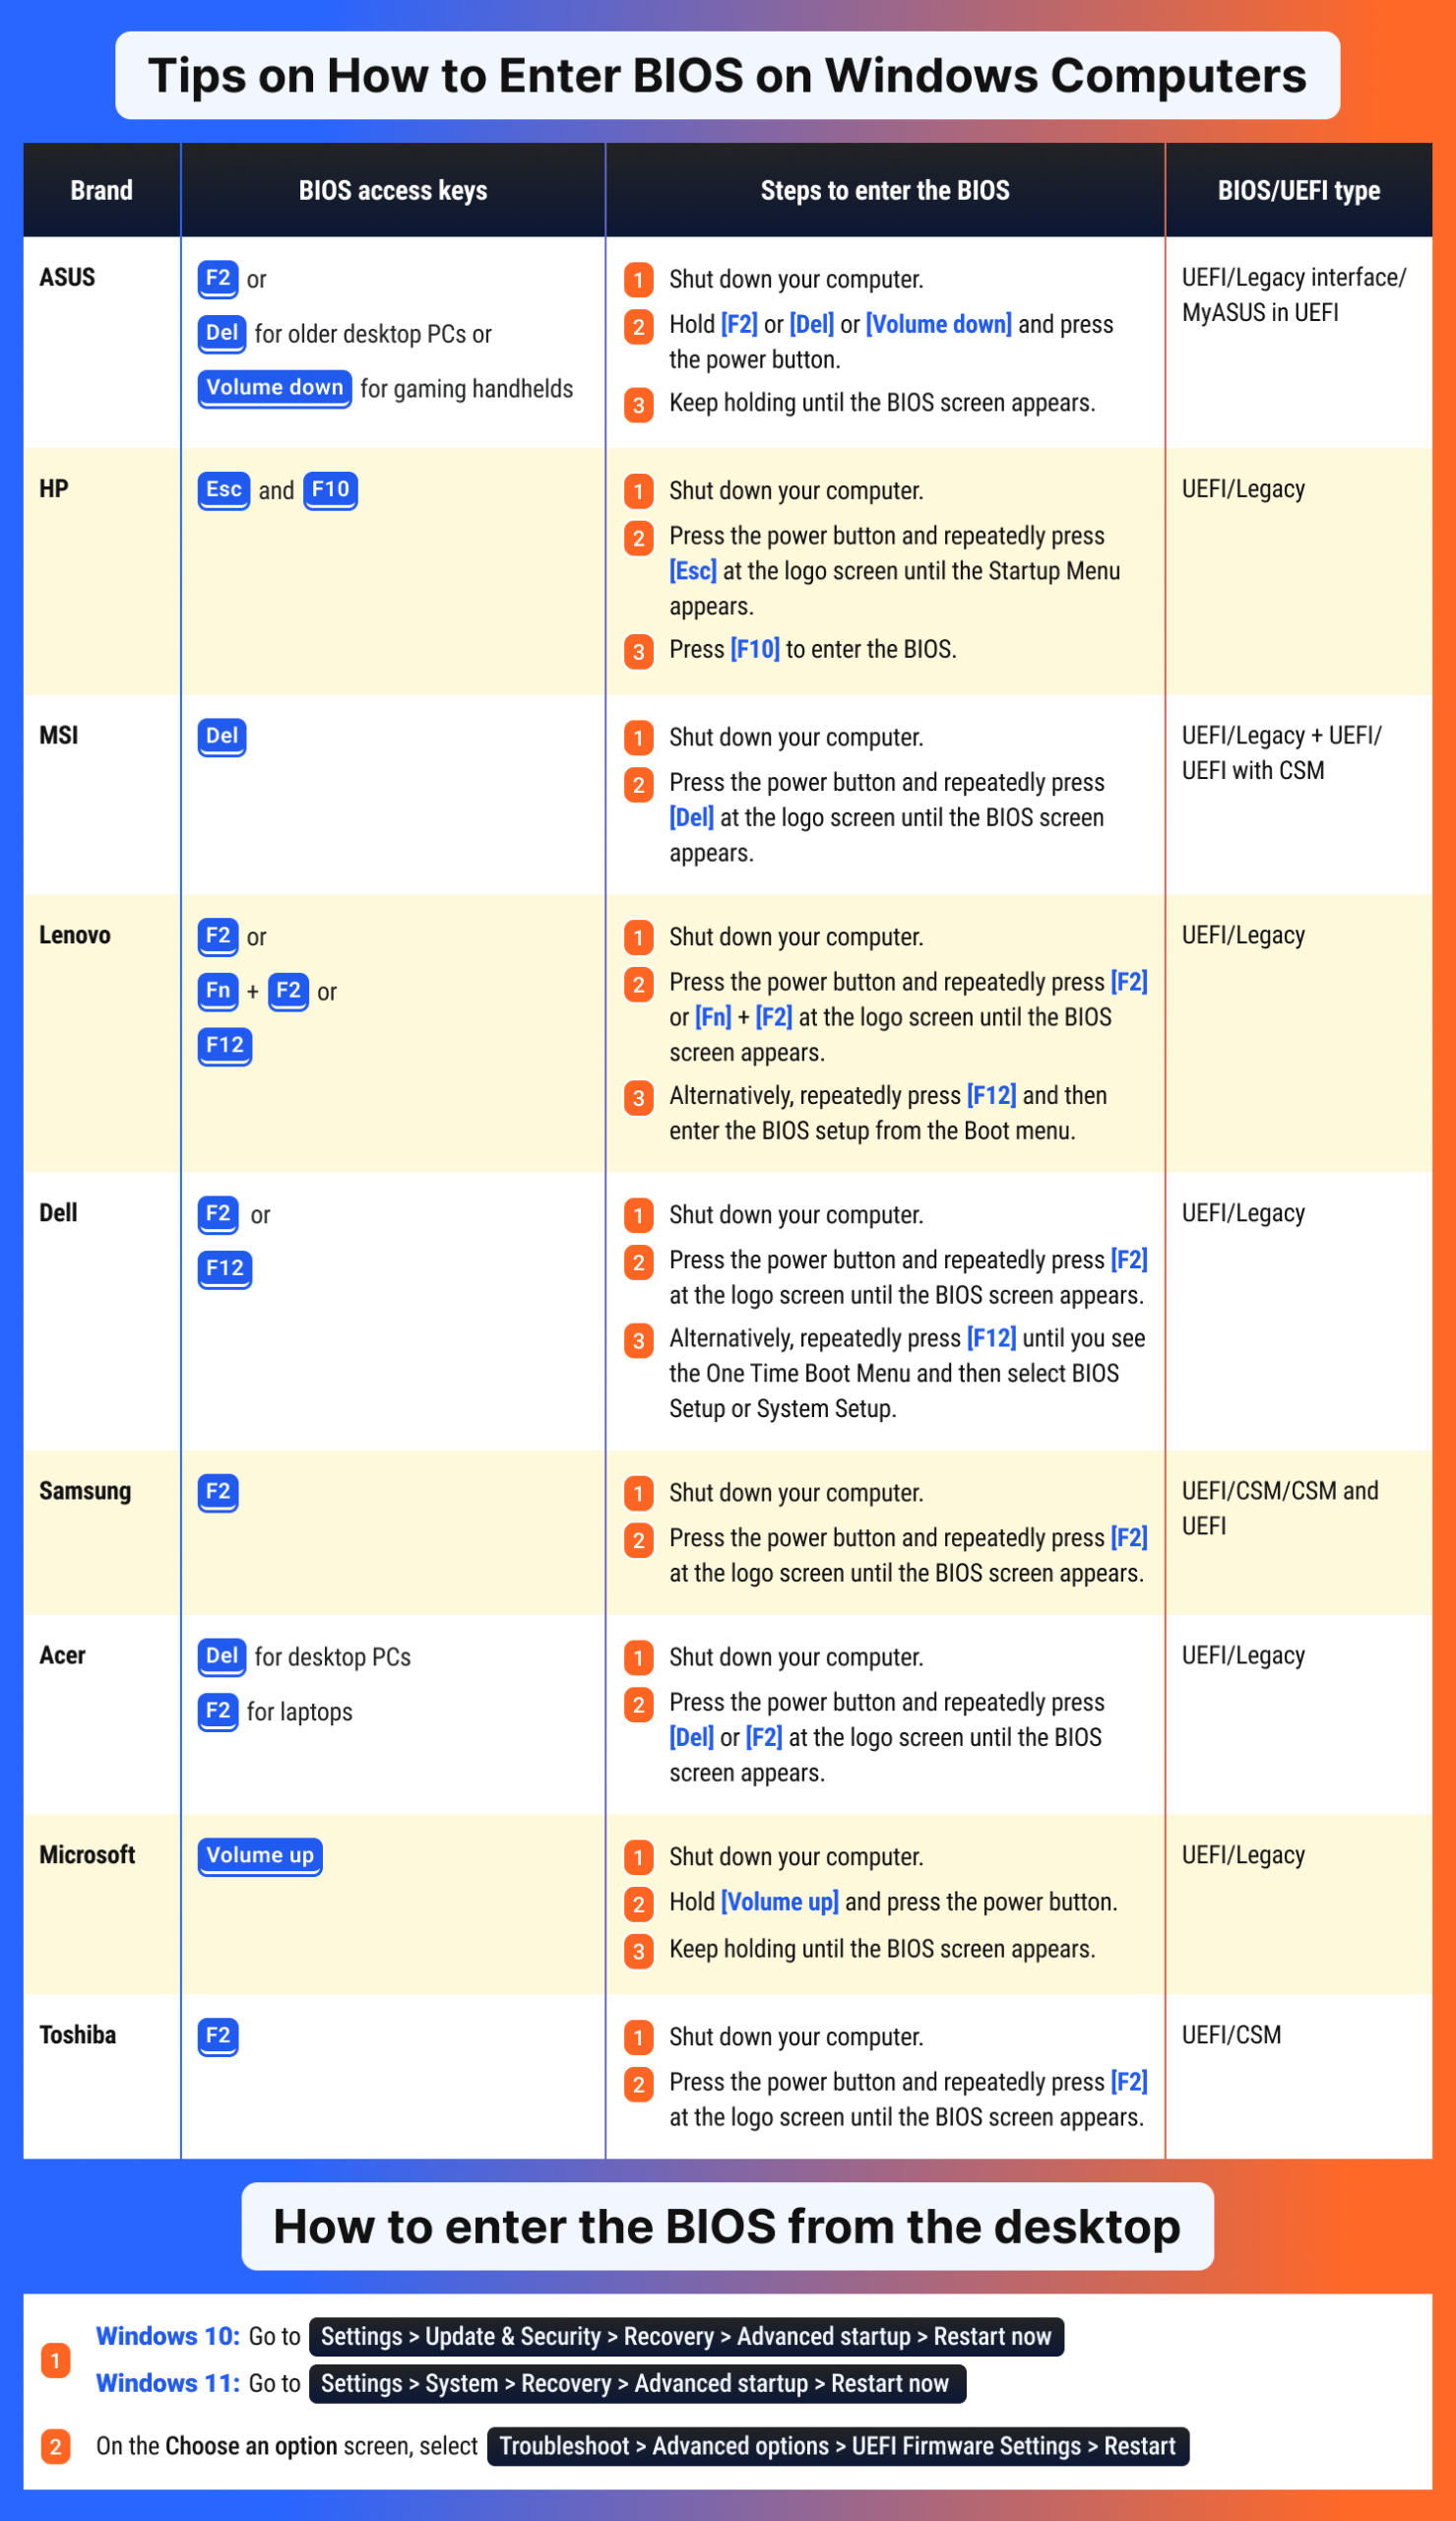
Different Windows computer models generally require you to use specific hotkeys to get into the BIOS settings. We have mentioned F2, which is what many of these models have configured the BIOS settings with. Others use the Delete key, the Esc key, any other hotkey, or a combination of these:
- Acer, ASUS, Dell, Lenovo, Origin PC, Samsung, Sony, and Toshiba require you to click
F2to access the BIOS settings. F10is the primary hotkey for opening the BIOS settings on HP. You can also useEsc, similar to how Dell computers allow the use ofF12.
If you tried the hotkeys above and still can’t get into the BIOS settings, try using a combination of these hotkeys with the Fn key.
- For Lenovo PCs, for example,
Fn + F2should get you into the BIOS settings. - All in all, clicking at least one of these keys—
Esc,Delete,F1,F2,F10, orF12—at the point of PC bootup should get you into the BIOS settings.
How to Optimize the BIOS for Gaming
Any dedicated gamer knows that optimizing speed and responsiveness is the key to enjoying the most demanding PC titles.
So, how do you unlock high BIOS performance?
Boosting PC performance via the BIOS settings generally has to do with tweaking the PC’s CPU clock speed, CPU frequency, or CPU voltage.
Once these settings have been adjusted to reasonable limits, your PC will follow up by operating at a higher—or lower—ceiling depending on whether you increased or decreased those values.
The result is your PC running slower or faster.
The basic Windows computer is factory configured so that it offers the best mix of speed and performance at default settings.
Even so, the user can go the extra mile and tweak the BIOS to eke out further performance gains.
Here is your quick checklist of key BIOS tweaks to take your gaming experience to the next level:
✅ Update BIOS firmware
to gain performance improvements and better hardware support.
✅ Enable XMP/EXPO to run your RAM at its full rated speed.
✅ Overclock the CPU to boost processing power and increase FPS in games.
✅ Enable Resizable BAR (SAM) to allow full GPU memory access for smoother gameplay.
✅ Activate Game/Performance Mode for automatic system tuning optimized for gaming.
✅ Raise or remove CPU power limits to enable sustained higher boost clocks.
✅ Enable Precision Boost Overdrive and Curve Optimizer on AMD systems for better CPU performance.
✅ Manually optimize RAM timings to improve memory latency and bandwidth.
✅ Tweak PCIe lane configuration to maximize bandwidth for your GPU and SSDs.
✅ Adjust fan curves to improve cooling headroom and prevent thermal throttling.
✅ Disable unused onboard features to free up system resources and reduce latency.
There is no one-size-fits-all rule for improving gaming performance via the BIOS. For example, the best ASUS BIOS settings for gaming might differ from MSI’s or ASRock’s BIOS settings.
This is because the motherboards are designed differently.
However, despite the variations, the goal—boosting gaming performance—remains the same. To optimize your BIOS specifically for gaming, you can tweak several settings, such as fan speeds, drive configurations, and RAM performance.
What are the best BIOS settings for gaming?
Now let’s see what you can do with your BIOS settings for a gaming performance boost:
➡️ Update your BIOS firmware. Start by updating the firmware. An updated BIOS often includes performance improvements, better CPU microcode, refined voltage curves, and improved memory compatibility. Check your motherboard manufacturer’s website for the latest releases, then use the BIOS flashing utility (EZ Flash, Q-Flash, M-Flash, etc.) to update.
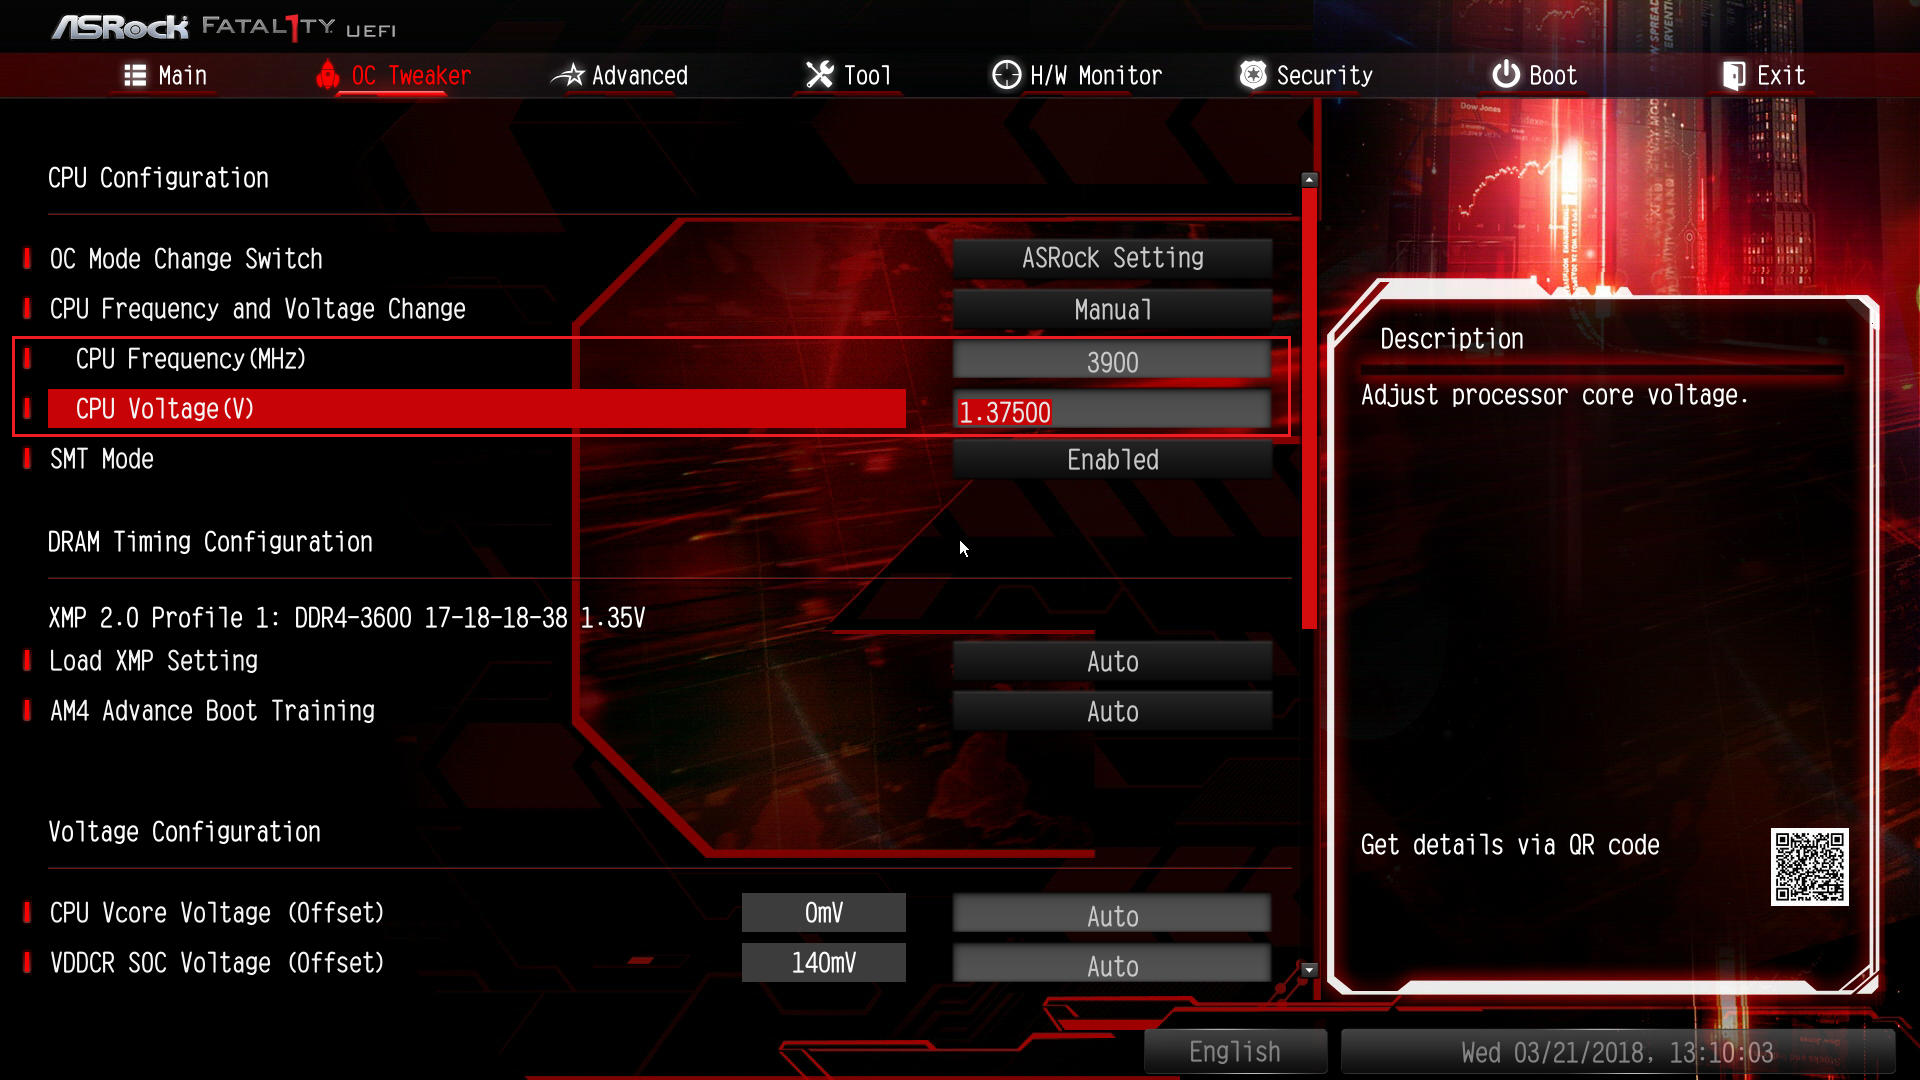
➡️ Overclock your CPU. Overclocking is by far the leader among the best BIOS settings for gaming out there. Some newer motherboards even offer automated overclocking presets. However, with great power comes great responsibility, and too much voltage or too high a multiplier can lead to overheating and instability.
To overclock your PC in the BIOS, go to the Overclocking (or something similar like OC or OC Tweaker) section and increase CPU frequency and voltage in small increments. Stress-test your system after each change, keeping an eye on the temperature and overall stability. Before you start, make sure to read our article on how to safely overclock a CPU.
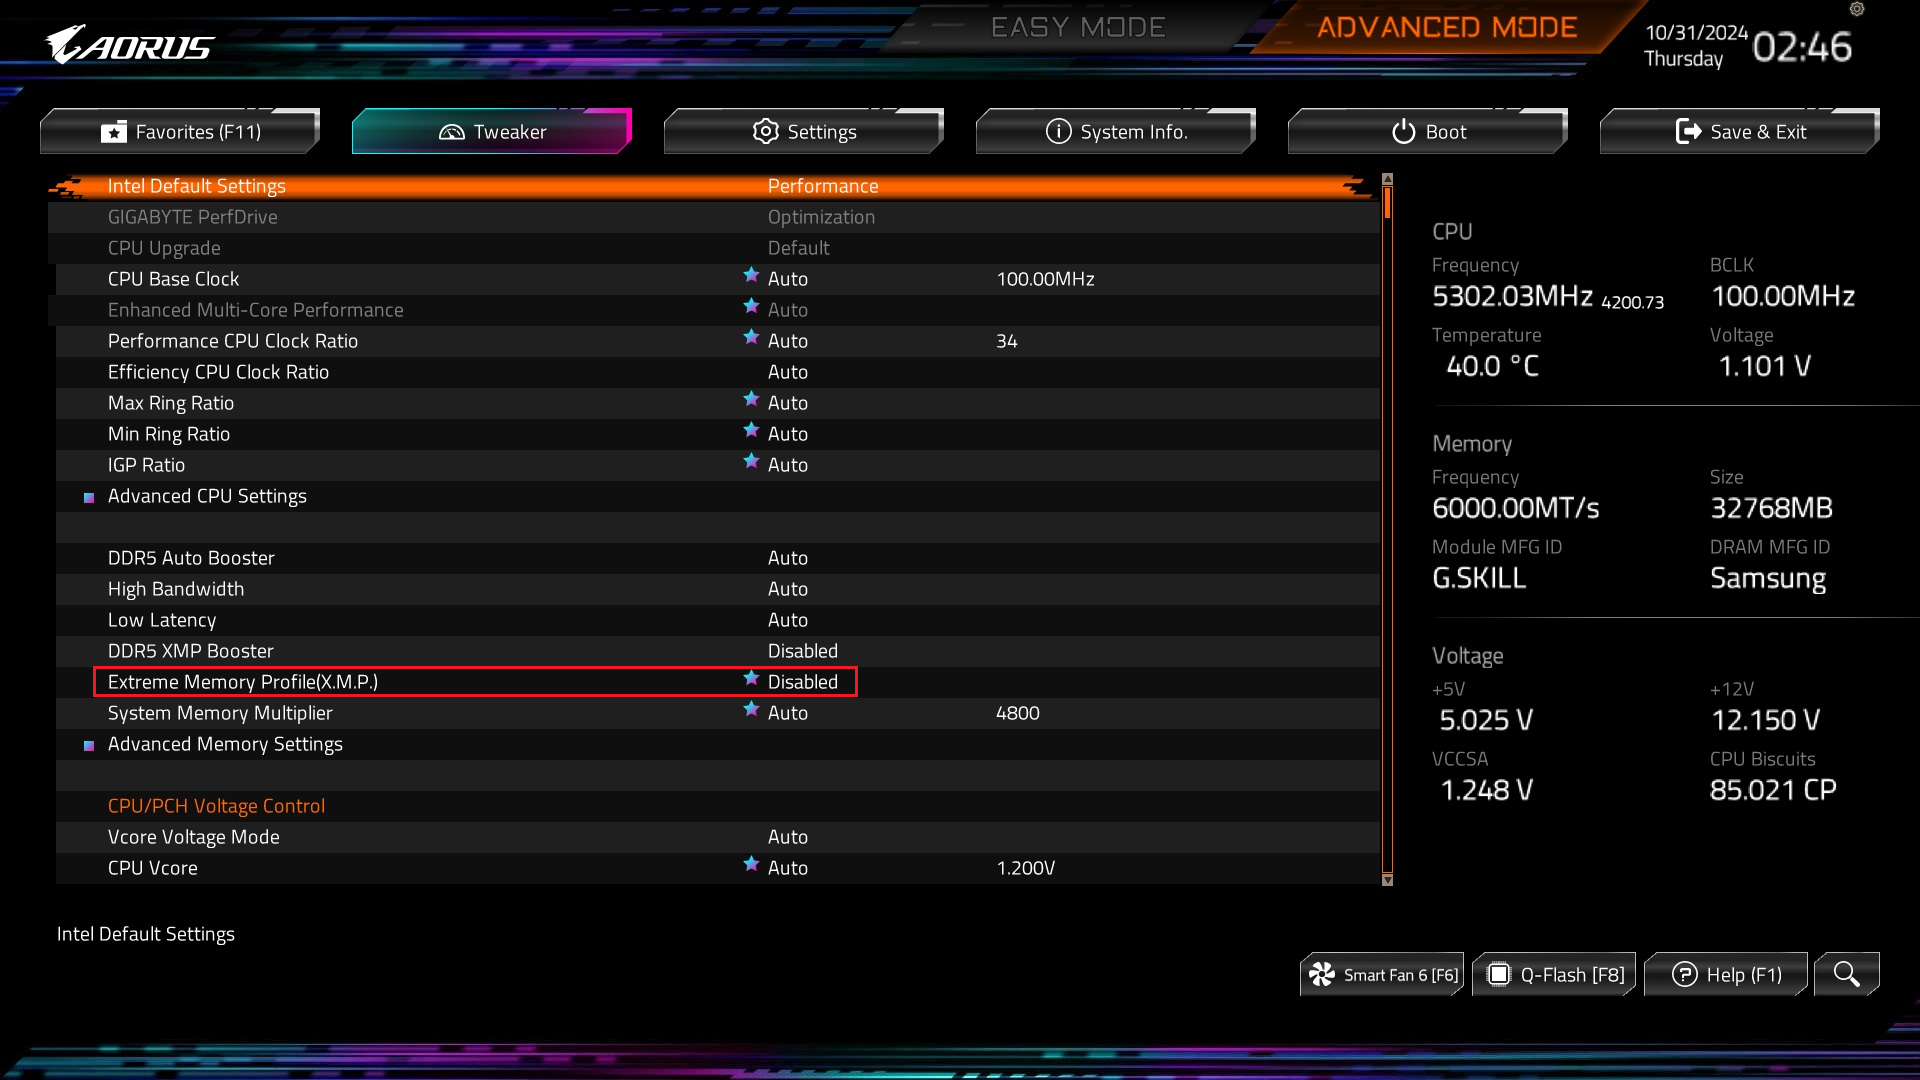
➡️ Enable XMP (Extreme Memory Profile) or EXPO (for AMD). If you have DDR4 RAM, enabling XMP allows your RAM to run at its rated speed (e.g., 3200 MHz, 3600 MHz). On DDR5 kits, AMD-branded boards support EXPO profiles, which serve the same purpose. To enable XMP, enter the BIOS setup during startup, go to the AI Tweaker, Overclocking, or Memory Settings section, and set XMP to Enabled.
📌 Also read: DDR4 vs. DDR5: Is DDR5 Worth It? Here’s What You Need to Know
📌 Also read: How to Stress Test RAM Right
➡️ Activate Game Mode or Performance Mode. Many modern motherboards have a dedicated Game Mode or Performance Mode toggle that automatically applies a suite of optimizations for gaming (tighter power limits, increased fan curves, more aggressive boost behavior). Check if you have one in the main BIOS menu or under the Overclocking (OC), Performance, or Gaming tab and enable it.

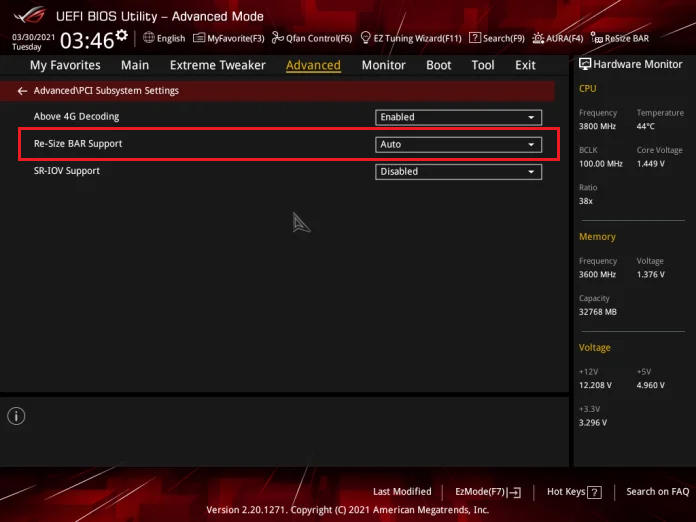
➡️ Enable Resizable BAR/Smart Access Memory (SAM). Both AMD and Intel platforms now support Resizable BAR (where AMD calls it SAM), which allows the CPU to access the full framebuffer of a compatible GPU rather than in small chunks. In the BIOS, find Re-Size BAR Support or Smart Access Memory under Settings or Advanced and enable it.
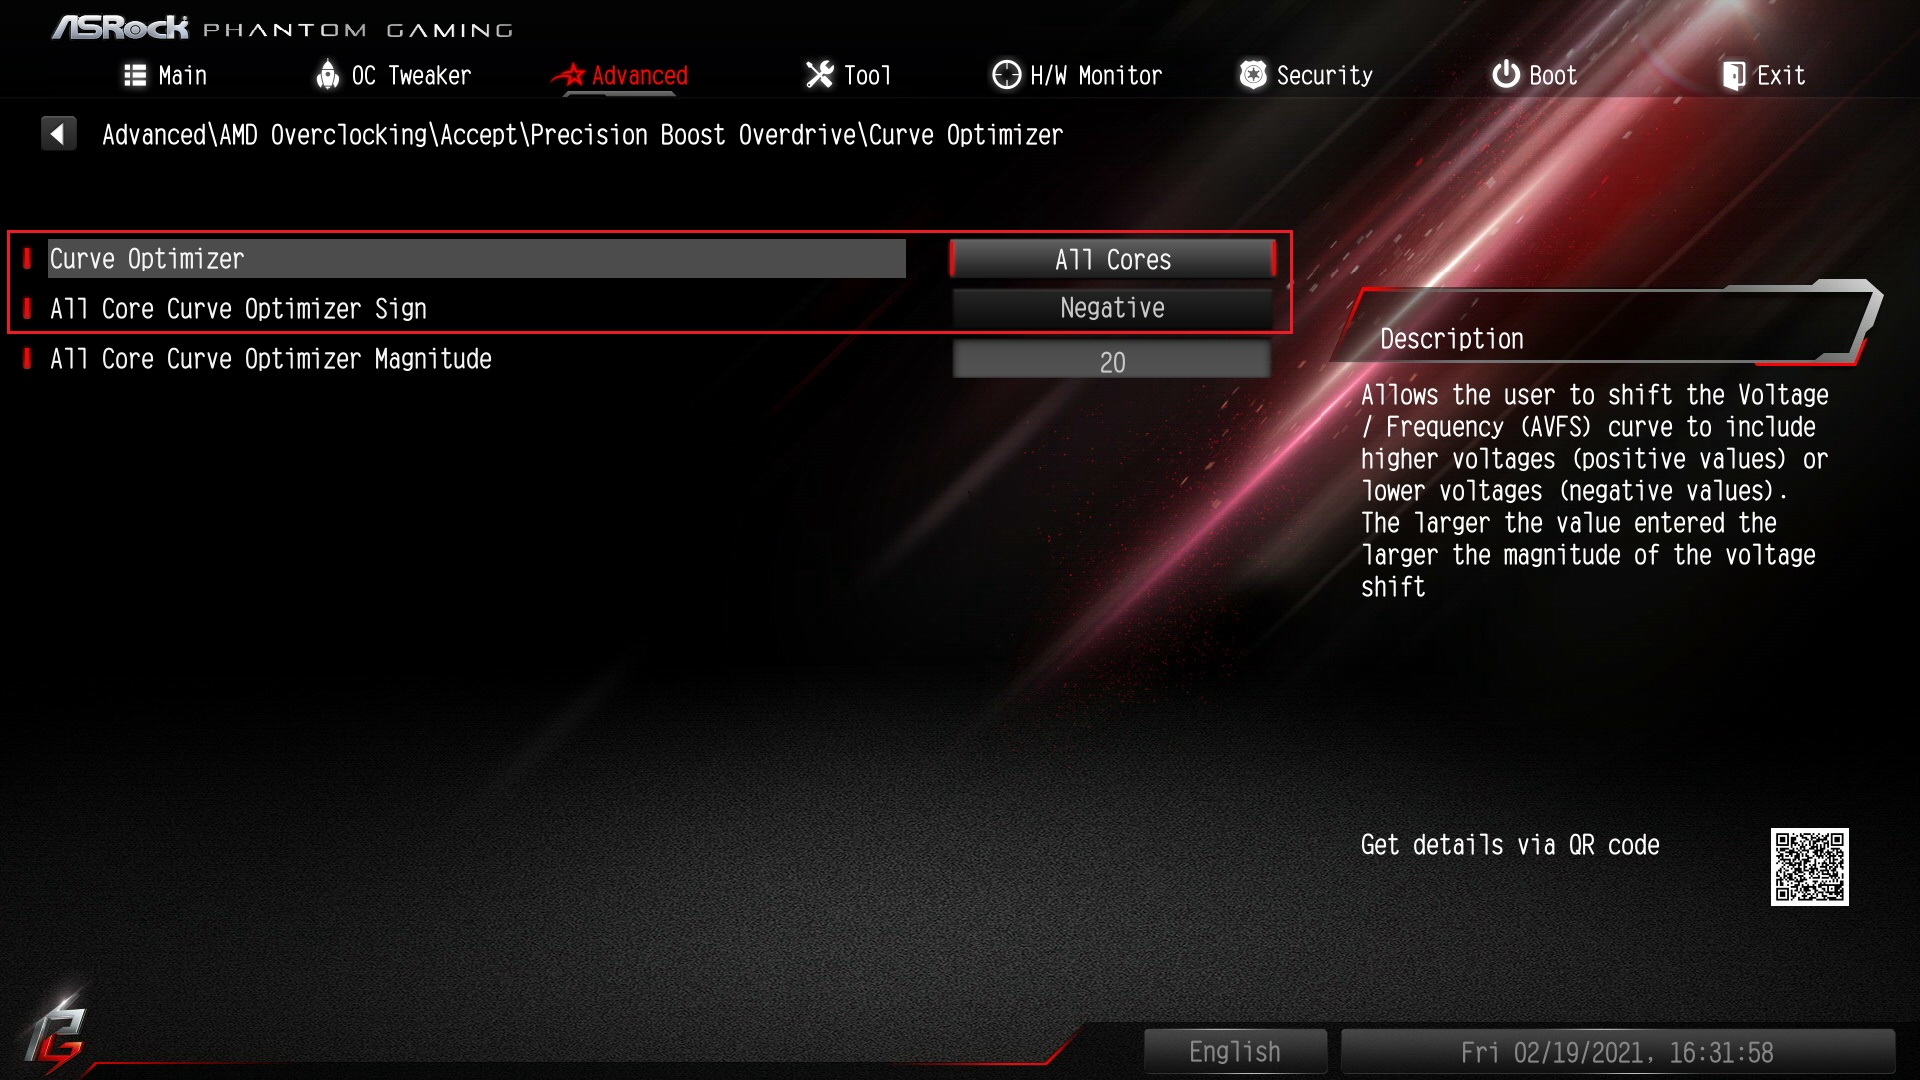
➡️ Enable Precision Boost Overdrive 2 (PBO2)/Curve Optimizer (for AMD). This feature is one of the most important BIOS settings for gaming. On AM4/AM5 platforms, PBO2 lets the CPU boost higher under sustained loads, and Curve Optimizer lets you adjust per-core voltage/frequency curves. In the BIOS, look for Precision Boost Overdrive, enable it, then select All Cores next to Curve Optimizer, and set it to Negative (this reduces voltage at a given clock, potentially improving thermals and allowing higher boost clocks).
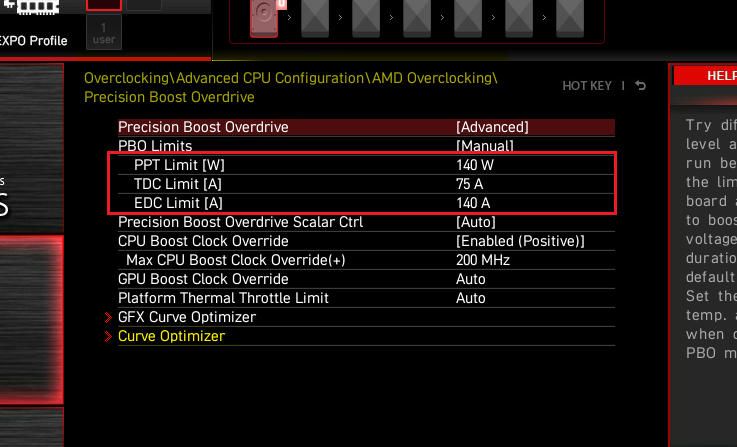
➡️ Remove or raise CPU power limits. Removing or raising power limits to their maximum can substantially improve performance. For Intel CPUs, disable or raise Long Duration Power Limit. On AMD, increase PPT (Package Power Tracking), TDC (Thermal Design Current), and EDC (Electrical Design Current) for higher sustained clocks. Just be cautious: unlimited power can spike thermals dramatically. These settings are typically under AI Tweaker, Tweaker, or Overclocking.
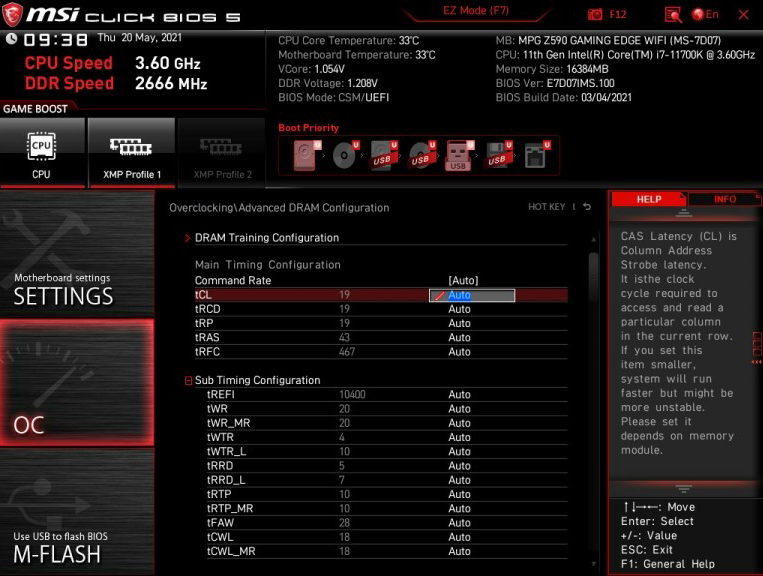
➡️ Optimize RAM timings. Beyond XMP/EXPO, you can manually lower primary timings (e.g., CAS latency/tCL, tRCD, tRP ) to improve memory performance. This is a more advanced tweak and requires complex manual adjustments in the BIOS. Set your kit’s frequency first, then tighten timings one notch at a time. Always test stability after each change.
It is typically found in the AI Tweaker, Tweaker, or Overclocking section.
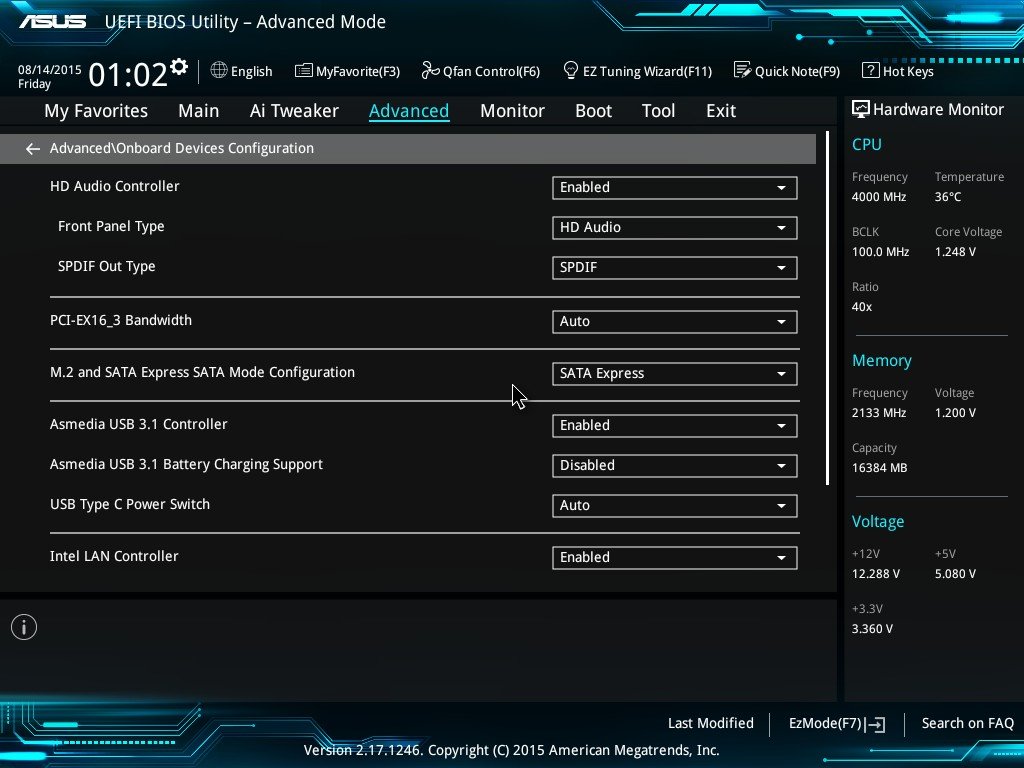
➡️ Disable unused onboard features. Turn off unused peripherals (e.g., legacy serial ports, audio controllers you don’t use, and unused SATA ports). This frees up some PCIe lanes or system resources, which can shave off microseconds in I/O and slightly improve overall performance.
Look under Advanced > Onboard Devices Configuration.
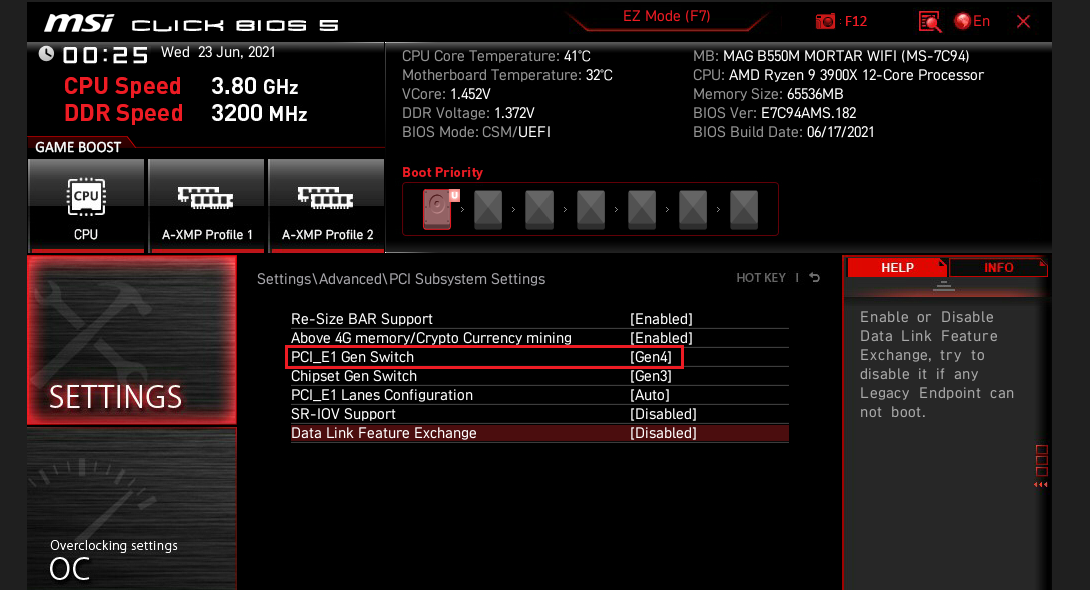
➡️ Tweak the PCIe lane configuration. If you’re using multiple NVMe drives or a second GPU, ensure that PCIe lanes are configured for maximum bandwidth—e.g., set M.2 slots to PCIe 4.0 or 5.0 rather than SATA mode, disable unused PCIe slots under PCI Subsystem Settings, and set PCIe Link Speed (or something similar like PCI_e Gen Switch on MSI boards) to Gen4 or Gen5 if your components support it.

Additional BIOS settings for gaming
- Fan settings in BIOS
To put it simply, increasing your PC’s cooling headroom will give you better gaming performance by maintaining higher boost frequencies under load and preventing thermal throttling.
Here’s how to turn up the PC fan speed in the BIOS:
- Reboot and enter the BIOS by pressing the designated hotkey.
- Go to the Cooling, Fan Settings, or Hardware Monitor menu.
- Adjust fan curves—either switch from Silent to Balanced or Performance, or manually raise the RPM thresholds so fans ramp up sooner.
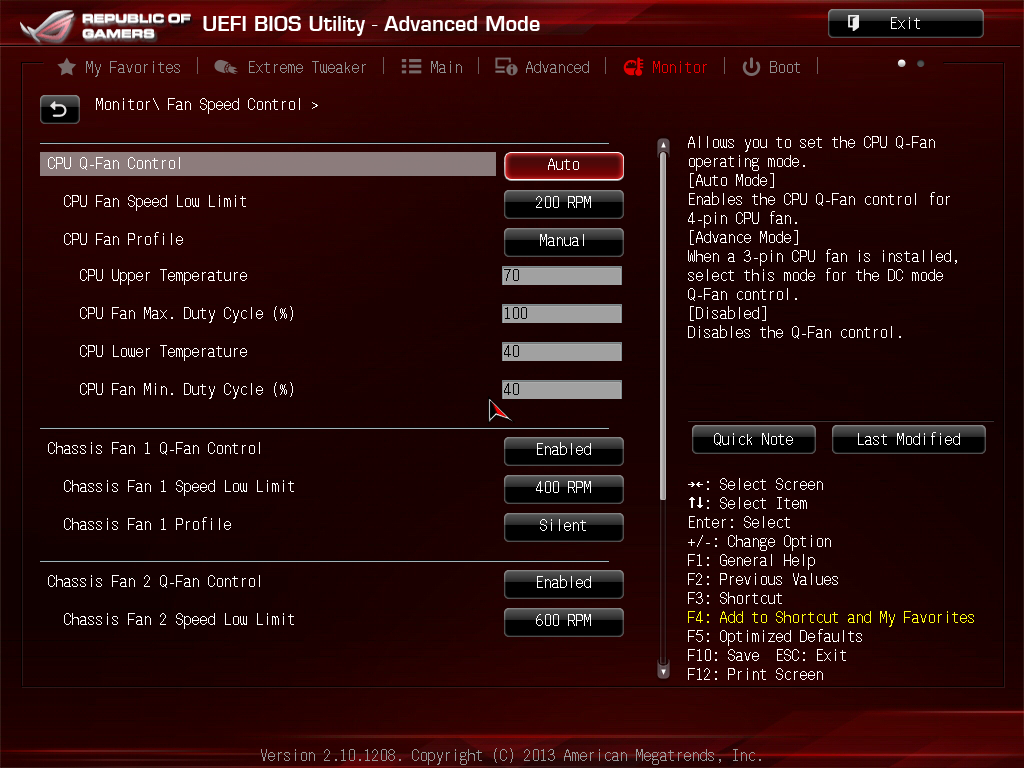
- Save the changes and exit the BIOS.
- SSD BIOS settings
Some older guides still recommend IDE Compatibility Mode for SATA SSDs—which is actually outdated and will severely limit speed. This, combined with outdated drivers, can be the reason for your gaming sessions being slow and glitchy. That said, proper SATA/NVMe configuration ensures your drives run at peak performance. Here’s how to fix this in the BIOS:
- Reboot and enter the BIOS by pressing the designated hotkey.
- Navigate to Serial ATA Configuration or SATA Configuration (sometimes under Advanced > Storage).
- Ensure the controller is set to AHCI rather than IDE. AHCI unlocks native command queuing and full bandwidth for modern SSDs.
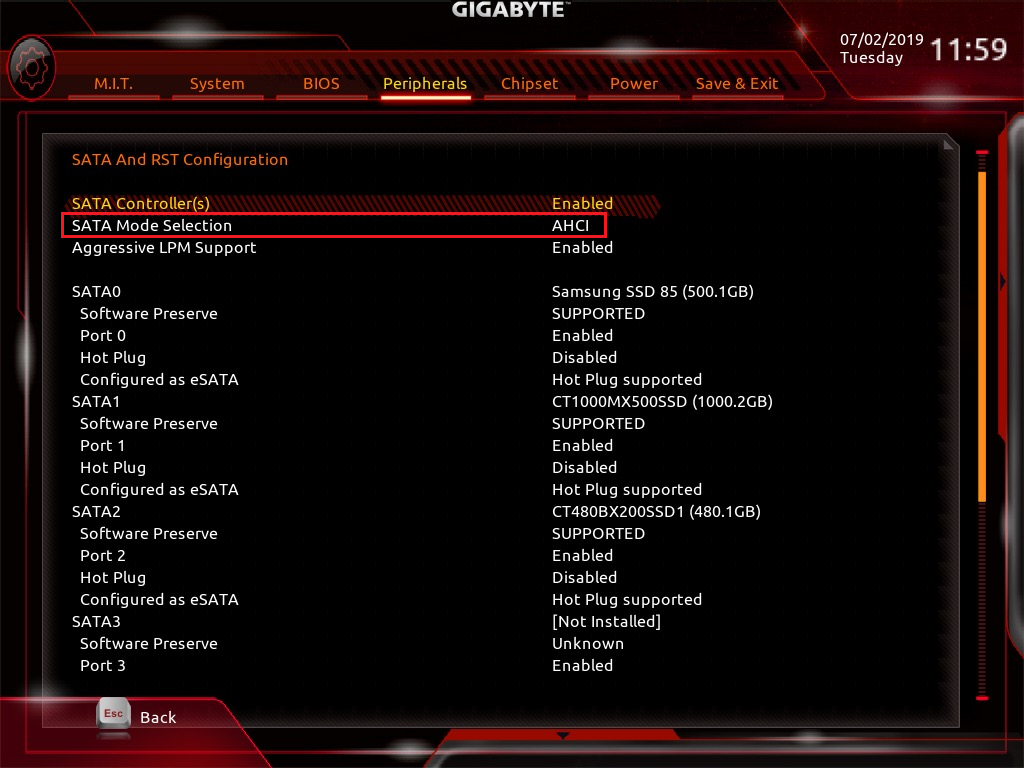
- For PCIe/NVMe drives, make sure the M.2 slot is set to PCIe (not SATA ) and set PCIe Link Speed or PCI_E Gen Switch to Gen4 or Gen5 (or higher) if your motherboard and drive support it.
- If you have multiple M.2 slots, verify that the lane configuration shares bandwidth appropriately (e.g., M.2_1 uses CPU lanes, while M.2_2 uses chipset lanes).
- Save changes and exit the BIOS.
Keep an eye on your SSD’s health and always monitor performance after making changes to verify you’re seeing full sequential and random read/write speeds.
Pro BIOS settings for gaming in 2025
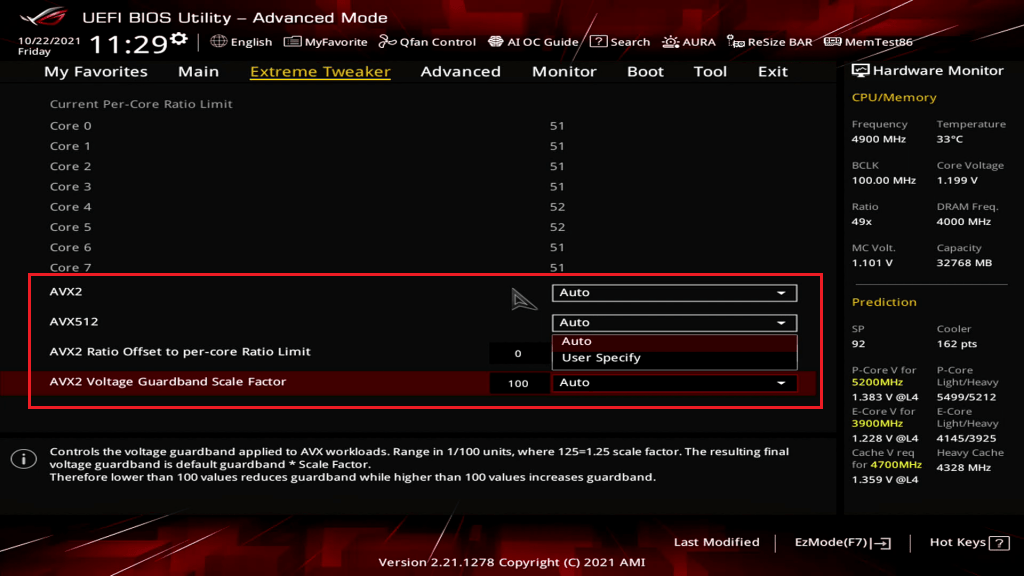
- Enable CPU AVX ratio offset or AVX2/AVX-512 guardbands (Intel). Newer Intel CPUs allow you to specify a different multiplier when running AVX workloads (which tend to spike power/thermal usage). By setting an offset, you avoid large clock drops under AVX-heavy loads—this keeps background applications from dragging down gaming performance.
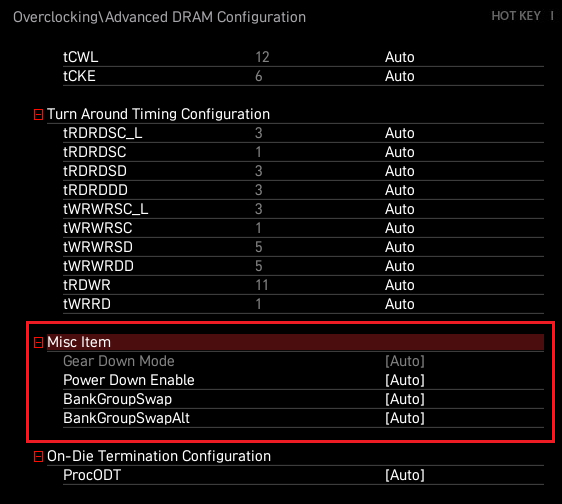
- Enable Gear Down Mode, BankGroupSwap, and other DDR5-specific options. Features like Gear Down Mode, which sets all memory commands to act like faster “half-rate” timings, can improve stability when pushing DDR5 past 6,000 MHz. Check under Memory Settings or Advanced DRAM Configuration for these toggles if you’re running high-speed DDR5.
- Disable C-States or set them to a higher number. Disabling the deepest C-States (like C6 or C7) can reduce latency when the CPU wakes up from idle. However, this increases idle power consumption—so only disable if you need every microsecond of responsiveness in competitive gaming. Check out this video for a quick walkthrough on a Gigabyte Eagle-series board: How to Manage C States Control on Gigabyte Eagle Series Motherboard?
- Check for new motherboard AI features. In 2025, more and more manufacturers offer AI features in their BIOS/UEFI interfaces to automatically profile your CPU and memory and find an optimal balance between performance and thermals. If your board supports it, you can delegate tuning to AI instead of manual tweaking.
Overview of BIOS settings for gaming and their effectiveness
| BIOS tweak | What it does | Effectiveness |
|---|---|---|
| Update BIOS firmware | Delivers firmware optimizations and new hardware support | High |
| Overclock the CPU | Raises clock speeds for higher FPS | High |
| Enable XMP/EXPO | Runs RAM at rated speeds | High |
| Activate Game/Performance Mode | Applies preset OC, power, and fan curves | Medium |
| Enable Resizable BAR/SAM | Grants the CPU full access to the GPU memory | Medium |
| Enable Precision Boost Overdrive | Increases sustained boost clocks | High |
| Remove/raise CPU power limits | Allows higher power draw for longer boost | Medium |
| Optimize RAM timings | Lowers CAS, tRCD, tRP for tighter memory performance | High |
| Disable unused onboard features | Frees IRQs/PCIe lanes and trims micro-latency | Low |
| Tweak the PCIe lane configuration | Ensures M.2/NVMe slots and GPU slots run at optimal link speeds | Medium |
| Adjust fan curve | Boosts cooling headroom to prevent thermal throttling | Medium |
| Set SATA Mode to AHCI (for SATA SSDs) | Enables full SATA bandwidth and NCQ | High |
| Enable CPU AVX ratio offset/guardbands | Prevents big clock drops under AVX-heavy workloads | Low |
| Enable DDR5-specific options (Gear Down Mode, BankGroupSwap) | Improves stability when pushing DDR5 past 6,000 MHz | Medium |
| Disable deep C-States (C6/C7) | Lowers wake-from-idle latency at the cost of higher idle power | Low |
What Is the Best BIOS Setup for New Gaming Builds?
When you’re assembling a fresh gaming rig, a quick BIOS tune-up right out of the gate can save you headaches down the line—and max out performance you’ve already paid for.
First, flash your motherboard to the latest UEFI to ensure full CPU and RAM compatibility. Next, enable your RAM’s XMP or EXPO profile so it runs at its rated speed. After that, bump up a CPU multiplier a bit or let AI do the job and turn on your board’s AI overclocking wizard.
Finally, make sure Resizable BAR (or SAM) is enabled, switch your SATA controller to AHCI if you’re using a SATA SSD, and tweak your fan curves so your components stay cool under load.
✅ Update your BIOS/UEFI firmware to the latest version
✅ Enable XMP (Intel) or EXPO (AMD) for rated RAM speeds
✅ Run AI overclocking or set a conservative CPU multiplier
✅ Turn on Resizable BAR/Smart Access Memory under PCIe settings
✅ Set SATA mode to AHCI for SATA SSDs (NVMe drives use PCIe)
✅ Adjust fan curves for balanced cooling versus noise
The Best BIOS Settings for Gaming: Explained
There you have it. Now you have a comprehensive list of the best BIOS settings for gaming. To conclude on modifying the BIOS settings on Windows PCs for better performance, note that each of the highlighted methods puts pressure on your PC. Any one of them might increase the power drain or even crash your motherboard.
As a result, you need to be careful when attempting to tweak your CPU clock speed or the RAM BIOS settings for a better gaming experience.
Was this article helpful? Don’t hesitate to drop a comment below and share your own tips with the others!
FAQ
To enable XMP (Intel) or EXPO (AMD) in the BIOS, follow these steps:
- Enter the BIOS and go to the AI Tweaker or Overclocking section (or something similar).
- Find and enable the XMP or EXPO option.
- Save the changes and exit the BIOS.